

Free Plans for an adjustably permanent Trailer Safety Chain Anchor system. It is easy to build, easy to install, absolutely solid, yet it allows chain length adjustments fairly easy. The goal is making the trailer safety chains very secure, while also making them adjustable. Easy, but for security, not too easy.
These are the plans – or more precisely – the steps to build the simple Chain Anchor system for your trailer. It is all free because we are putting our money where our mouth is. We want people to be safe when towing, and long, loose chains are a big factor toward making trailer disconnect events more severe. So, we will shorten them up. This is not the only way to do it, but it is a good way, fairly easy, and it works.
The concept is “Adjustably Permanent”. For a lot more detail on that, and the engineering involved, please see the previous article about Improving Trailer Safety Chain Connections. It talks about the path to this system.
Free Chain Anchor Plans
For the achieve the above pictured, very secure yet adjustable chain attachment, follow these instructions to build you own. Consider this page as Free Plans to better safety for a chain anchor.
1. Start with the Trailer Safety Chain of Your Choice.
Choose the chain based on the load capacity of the trailer. Chains are rated for the trailer capacity, not by break strength or physical size. Read the manufacturers recommendations.
2. Measure a Chain Link.

Find the outside width of a chain link as shown in this drawing as Dimension A.
3. Find the Bolt Size.
By measuring, or by inserting various sizes of boths, figure out the largest bolt size that will go through a chain link. The drawing shows this as Dimension D. Choose the largest bolt that will fit through a chain link.
4. Discover the Tube Size.

The link width Dimension A must be a little smaller than the Tube Inside so it will pass through. Our job is to figure out the closest fitting square tube that the chain will go through. Since steel tube is defined by the outside dimension, we must calculate the Tube Inside using the wall thickness, Dimension T. The equation, starting from the chain link width is: The minimum Dimension E =A + 2*T
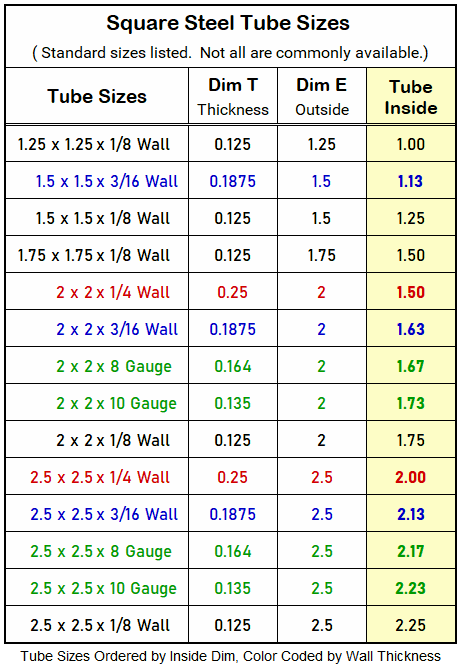 Unfortunately, the equation has 2 unknowns, T and E. But, because steel tube comes only in certain sizes, we can use a chart to find the one. This chart shows standard steel tube sizes including a calculated Tube Inside dimension. Just look to find the square tube inside dimension that is closest, but larger than the chain size Dimension A.
The Chart is color coded by Dim T (Wall Thickness), and sorted by Tube Inside making it easier to find.
Please Note: For the chain anchor tube, I recommend using at least 1/8″ wall for 3500 lb trailer, at least 3/16″ wall for 10,000 lb trailers, and at least 1/4″ wall for 14,000+ lb trailers. It is OK to be thicker than these numbers.
As an example of calculating: We start with Dimension A + 2 times the possible wall thicknesses to see what size will work best. If Dimension A = 1.18″, then starting with 1/8″ wall thickness, the equation becomes 1.18″ + 2 * 0.125″ (1/8″ wall) = 1.43″ That is a little under 1.5″, so 1.5″ Square tube with 1/8″ wall will work. Since 1.5″ Square tube is also available with 3/6″ (0.188″) wall, we will try that. This time we will calculate the other way around, 1.5″ – 2 * 1.188 = 1.124″ (which is the Tube Inside). Unfortunately, 1.124″ is smaller than the chain width, so 1.5″ Square tube with 3/16″ wall will not work.
5. Measure for Bolt Spacing.
In a perfect world, Dimension C from the Chain will exactly equal Dimension Cb on the Tube. However, there is a little extra space usually in the chain links we show as C Tolerance. The hole spacing is then Dimension C +/- C Tolerance. (The way it is shown on the drawing, it is minus C Tol, but think about it, since we have that space available in both chain links the bolts are in, it makes it + or -.)
6. Calculate Length for the Chain Anchor Tube.
This requires just a little bit of calculating. We recommend the bolts are, Dimension H, at least 2.5 diameters of the bolt size from the end of tube. For example, if the bolt is 1/2″ diameter, then Dimension H = 2.5 * 1/2″ which is 1.25″ minimum. You can certainly make it more.
Dimension Cb is the bolt spacing we found in the step above. So, the minimum Tube Length is Dimension H * 2 + Dimension Cb. The goal is to get both bolts through the tubes and through the chain links with material around to support an emergency. The tube can certainly be longer if desired.
7. Get the Tube.
We suggest making a square tube out of paper to the size calculated above. Use the paper tube (made to the outside tube dimensions) to make sure it will fit nicely on the trailer tongue. Make sure the bolts will have space.
Steel Tube is easily available in many sizes, and easily cut to length for you at various online sources. Coremarkmetals.com is a good place for structural steel square tube. Metalsdepot.com is also good, but the website is not as easy to navigate. I like these online sources when I only need a small amount.
You can have them cut the pieces to length, or you can buy part of a stick and cut the pieces yourself. (I usually buy more than I need so if I make a goof, I have extra to do it again. Sshhhh, don’t tell.) It is also nice to have some extra to give to a friend so they can do the same.
8. Drill the Bolt Holes.
We know the size of the bolts from above. I recommend drilling the bolt hole 1/64″ or 1/32″ larger than the bolt.
From our example, if the bolt is 1/2″, then drill the holes at 33/64″ or 17/32″. It is nice to have tight and precise holes, but in reality, that is not always so easy in a DIY shop. Either way, use a drill press so the holes do go straight through the tube. That will help a lot with alignment when mounting to the trailer.
Check out the article on aligning misaligned holes if it does not want to assemble right after you have drilled the holes.
9. Decide on Bolt Lengths.
The bolts must be long enough to pass through the chain anchor tube, and the member it is bolting to, plus have room for washers and locknuts. Measure the trailer beam where this will attach, then add it all up to get the required length of the bolts. Typically the washers and locknuts will take 2-ish times the diameter of the bolt. Again, going back to our 1/2″ bolt, the lock-nut and washers will take about 2 * 1/2″ = 1″ of bolt length. Round up to the nearest standard (usually increments of 1/2″) and you have it.
We always recommend washers on both sides of the bolted connections because they spread the load when high forces come. Washers are cheap, so there is no reason to not use them. We also strongly suggest locknuts like Nyloc nuts, or others. In a vibration environment like a trailer, locknuts make sure things stay together.
10. A Real World Example.
Here is a full modeled example of the the system for my trailer using actual dimensions. The chain anchor tubes are cut in half in top view of the CAD model to show what is happening inside. The end view (down farther) shows the chain in the tube.

11. Assemble the Chain Anchor Mounts.

With the above information you have everything needed to make and mount the safety chain anchor. Go build it, one for each side of the trailer tongue. This works mounting one at a time on a V tongue, and it works mounting them together (for a single beam tongue).
Images on this page show a single tube tongue, but the system also works on a V tongue. Just make them independent, bolting one to each side of the V.
Test the tube with the chain after drilling the holes to be sure bolt spacing will assemble easily. If the chain is tight in the links, drill one of the holes with a slightly larger drill bit to add a little tolerance. The chain should be loose on the bolts and free to move in the anchor tube.
12. Put the Chain Anchor Tubes on the Trailer Tongue.
Attach the metal tubes to the trailer tongue by drilling companion holes through the tongue beams. I recommend drilling the holes in the tubes first, using a drill press, then clamp the tube to the trailer tongue and use the tube holes as a pilot for drilling the tongue holes. See this process to Drill Perfect Matching Bolt Holes, Method 2.
Mount the chain anchor to the tongue as close to the hitch as practical. Remember, one of the goals is to make the trailer safety chains as short as practical. Don’t go crazy with it, but make it close.
After testing that the bolts all fit, you may weld the tubes to the tongue if you wish, or just leave them bolted. It is perfectly strong for just bolting, but welding adds one more step of security and convenience.
As another option, the chain tubes can be glued to the tongue. The glue will not help in an emergency situation, but it will hold the tubes in place when you take the bolts out to adjust chain length.
13. Finish The Chain Anchor Tubes.
Paint or finish the chain anchor tubes. If they will bolt on, this is easily done away from the trailer. If they weld-on, they will need finishing in place.
The final system will have tight, solidly mounted bolts clamping the tube. At the same time, the chain will be free to move inside the tube. Not extra stress on the chain at all. The chain anchor is the solid bolts.
If rattling is any concern, feel free to add some thin rubber sheet as a liner inside the tube. It is a little klutzy to work with, but it damps the metal to metal contact. I do not find it necessary, but it is a thought.
Enjoy Your New Chain Anchor System.
If you take a little time to do it well, they will serve you for a lifetime.
It is a little different, but effective. It is not the end-all in chain anchoring systems, but it fills a need. A couple other possibilities are shown near the end of the previous article on Safety Chain Connections.
While this concept is not as easy to adjust as others, say the Link Lock System, it is much cheaper to make, and it solves a couple niggly things of that system. Feel free to let us know your thoughts in the comments.
Then, for a lot more information on attaching chains, please see how the “Rules” came about in the article about mounting trailer safety chains.


Comments