

As with many things, there is a lot more to mounting trailer axle springs than first meets the eye. In this article we will cover 2 important, but easy, tips to make your trailer frame stronger.
Once you have placed the axle properly, it is time to mount it. There are many suspension options available, yet leaf springs are still the most common, and arguably least expensive. They are the workhorse of trailer suspension, yet they are often hung wrong.
Is “Wrong” too strong? OK, “Improperly” or “Less Than Perfect” are better descriptions. But, if they work, how is it wrong? We will talk about 2 things that are super easy to implement while building a trailer to improve the interface with trailer axle springs. It makes the trailer frame stronger – and that is always a good thing.
If you are not using leaf springs, these same ideas apply to other axle mounting as well. The ideas just need to mutate so they apply more directly to the other axle types.
Ah, but first some background.
Beam Stress
When loading a trailer, a stress is created within the supporting beams. If the stress is below the material limits, the beams hold just fine. If the stress becomes greater than the material limits, then the beam will bend or break. That is failure.
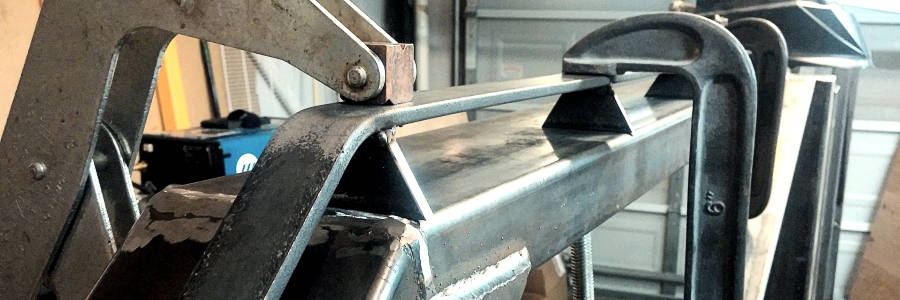
Failures (breaks or bends) usually start at stress concentration points – areas where the stress becomes locally high in a small location. Figure 2 shows an axle mounted under a trailer frame beam. Wheels, tires and crossmembers are removed from the image clarity.

Dark blue is low stress, and red is high stress. (Red does not mean instant failure, rather it shows where the stress is much higher. Actual values will determine safety or failure, however, for this discussion, red colors are an area of concern.)
In Figure 2, you can see some stress concentrations that appear as smallish red areas. Other stresses around them (indicated by greens and blues) are not as high, but because of the construction, there is concentration of stress in areas adjacent to the spring mounts. The back mount shows more because of the angle of the pivoting spring shackle. That is normal.
Side Note: Figure 2 is a static, vertical load analysis. Dynamics like bumps in the road, or trailer braking will add stress, and change the stress profiles somewhat.
Weakening The Beams
This stress distribution is typical of leaf type trailer axle springs. Values change and beam sizes change, yet distribution remains pretty similar. Notice how stress in the main beam is higher on the top and bottom of the beam (as compared to the center side areas). This is typical of a beam where the forces are in “bending”. (That does not mean the beam is bending, but the forces are in that direction.)
Combine these ideas of stress distribution with the fact that welding weakens the areas immediately around the weld. (I will not go into the heat distress of welding in this article, but please know that welding changes the material properties immediately around the weld, and the result is a localized weakening effect.) If we weld in areas of high stress, we effectively decrease the strength of the beam.
Can we avoid the local weakening effect of welding? Yes.
Interestingly, the areas of suspension mounting are of the highest stress areas on a trailer frame. The spring mounts carry all the load to the suspension in just a few points. This is where all the trailer weight is held by the springs. All the trailer weight, on just a few points. That is one reason why the trailer axle springs mounting is so important – and why we see failures in this area when it is not done right.
As a side note, this is actually, true with every axle and every suspension type. Yes, they all mount a little different, but they all transfer forces to the trailer frame.
TIP 1: Do Not Weld on the Top or Bottom Faces of a Beam in Areas of High Stress.
 OK, I understand the idea, but . . . How do I weld on the spring mounts?
One way is to weld the brackets on both sides – only. Keep in mind, this is not for the sake of the bracket, but for the beam. Do not weld across the main beam bottom face. And, for that matter do not weld across the top face either. For an illustration of how welding changes and weakens the parent material, read this article about a welding failure.
I realize it is very common, and in fact, from the bracket standpoint, it is stronger to weld across the front and back portions of the bracket. I also realize that to combat the distortion of welding across the bottom of the beam, trailer builders will often also weld across the top. Yes, this helps straighten the beam, but it actually weakens the beam both on top and on bottom. Read on for the solution.
For a lot more detail on this topic, we have an article which discusses the Engineering involved.
Spreading Trailer Axle Spring Stresses
Another key to strengthening a trailer frame is reducing or eliminating the stress concentrations. Failures almost always start in areas of stress concentration, so if we get rid of them (or minimize them), the frame is stronger.
The Trailer Plans from and Mechanical Elements have always had a buffer piece between the main frame member and the spring mounts. Customers ask about it, so here is a graphical engineering analysis showing why we do it.
Start by looking back at Figure 2. Note the points of red on the main beam. (You can ignore points of red on the spring mount brackets because they are typically higher strength steel. The same stress means less to them.)
Now we can insert a buffer piece between the spring mount and the main frame beam as in Figure 4. Just that one strip placed between the brackets and the frame changes the stress. Note there are no red areas on the main beam, and only small amounts on the inserted buffer piece. We do not care so much about stress in the buffer because it is there to take the stress and protect the main beam.

This trick can be done with a strip of steel like in this example, or with one leg of angle iron or with something more substantial. The point: Stress in the main beam spreads. We depend on the main beam to support loads of the trailer. If we reduce the highest stress on the main beam, then we strengthen the whole trailer.
Tip 2: Add a buffer between the main beam and the high load points.
Make the buffer piece at least as thick as the spring mount bracket material. 1/4″ is shown here. Extend the buffer beyond the spring mount – more is better – but there is a diminishing return. We find 5 or 6 inches out both front and back from the brackets will work wonders.
Finally, weld the buffer piece to the main frame beams in stitches only along the sides – not on the ends. Short, spaced welds (stitches) are great.
Two other ways to spread the stress include your choice of beam material, and the length of the springs.
More Than Mounting Trailer Axle Springs
The buffering trick above will spread the stress of the trailer axle springs, and do more than just disperse stress concentrations near the brackets. The 2 images below show how it spreads stress all around the beam. It works because what you do on one side, also effects the others. If you weld and weaken one side, it weakens the whole beam. Cut one side, and the others have to make up for it. Also, if you strengthen one side, it adds strength to the whole beam.

Now you know 2 great tips for making a better mount for trailer axle springs. 1. Do not weld on the stress faces of a beam, and 2. Add a stress buffer to spread the stress concentrations. For a third tip, use longer leaf springs. The change is not as dramatic, but it is in the right direction.
Now you can mount your trailer axle springs with confidence, knowing you are making the trailer stronger, not weaker, with the spring bracket welding.
For a good example of missing this point, check out the article What Is Wrong With This Picture? Then, as you set your axles, make sure to properly calculate the axle placement. – For a new trailer, use this link for where the axle goes, or for existing trailers, use this link for axle position calculations.
Next up? There is always more to learn. Here are some other good trailer axle related articles:
Read about Trailer Axle Overhang, and why that is important to know. Also, the article comparing a single axle with tandem axles for the same capacity.
Good Luck With Your Projects!


Comments