
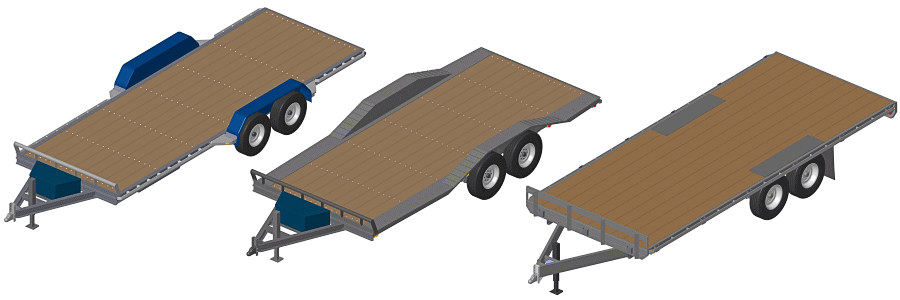
FTrailer frames typically fall into one of three styles: – 1) Wheels outboard of the trailer frame; 2) Trailer frame extending around the wheels; or 3) Trailer deck over the wheels. These 3 are in the image above, left to right.
For this article we will focus on the center one, building a trailer frame around the wheels. Or should I say, trailers where the wheels are flush with the outside face of the trailer. The image above shows the side extension as part of the drive-over fenders – which is not the classic way – but has the same result with a specific purpose.
There are a bunch of ways to describe it – Wheel Enclosure, Frame Side Overhang, Flush-Mount Frame Extension, and more. Whatever you call it, our focus is the second one, where the trailer frame extends around the wheels.
Here is another graphic showing a top view in a classic way for the first two styles. For ease of explanation, the fenders are not in these images.

The second method is valued because it has more deck space. Then, when enclosed, it has a greater interior volume for the same trailer length. Also, in some situations, like the drive-over fender trailer above, the greater width allows loading of wide cargo that won’t fit in the legal width trailer using a straight frame.
Differences In Trailer Frame Construction
The differences may be fairly obvious, but we will add a few photos here to emphasize. The trailers above are flat beds, but the biggest reasons for extending the frame to the sides is for an enclosed trailer like in these photos.
 First, the Straight Frame with wheels outboard of the frame. This makes a tidy box with a clean shape both inside and out.
 Second, a trailer where the Frame Extends out Around the Wheels, flush with the wheels.
A look on the inside of each trailer is also descriptive of the frame style differences. (Photos in this section are from Brechbill Trailers. No affiliation.)

Some people prefer simplicity of a straight frame trailer. Others like the visibility and lower aerodynamic drag of a straight frame (not as wide). Still others prefer the maximum volume of the side extended trailer.
Both styles have their place – and their shortcomings. However, in this article we are looking at ways to build a trailer frame around the wheels.
Building A Trailer Frame Around The Wheels
Construction of a trailer frame to extend the sides out around the wheels makes it a little more complicated. Not bad, but there is a little more to it than for a straight frame. Here are 3 ways to accomplish the task:
- Use Outriggers. This is a classic approach we see frequently.
- Use Cross Members placed over the main frame beams.
- Extend Cross Members through the trailer frame. (Pass-Thru)
Continue reading for more about each of these methods.
Outriggers
This method is adding extension brackets to the trailer frame perimeter around the wheels. Construction of the side extensions is to support a floor farther out.

The outrigger brackets are in this image with a green tint. They are bent sheet metal welded to the frame sides in the right locations leaving space around the wheels.
2 URLs of outriggers for sale. (No affiliation with either of these.)
https://www.etsy.com/listing/1814831456/avion-heavy-duty-frame-outrigger
https://www.lippert.com/left-hand-frame-outrigger-7in-h-x-13375in-l-102403
Both are available in left and right versions.
Please note that the Lippert is not nearly as strong because it does not have the bottom fold. If you want outriggers, find (or make) parts that look like the next image – flanges both top and bottom.
Variations: The Drive-Over Fenders trailer in the top image is a form of Outriggers, but the manufacturing is different to provide a specific and strong design. Other variations also exist. We are only showing the most common in this article.

Outrigger Advantages:
- They are easy to visualize, and easy to understand how they work.
- Parts are available to purchase (then cut to length).
- Outriggers can be bent steel as shown, or they can simply be a piece of cut tube or channel. The shape in these images is not a requirement.
- Can place the brackets in any location along the beam, so it is easy to allow just the right amount of space around the wheels without aligning with the trailer frame cross members.
- Outriggers do not raise the deck with respect to the main beams like cross members over the main frame beams. (Shown below.)
Outrigger Disadvantages:
- While they are easy enough to weld on, they require some work to make sure they form a flat floor. Use a jig so they are straight and true.
- Typically, these require more time for setup, welding and cleanup.
- This method requires a lot of welding.
- Depending on how the brackets are made, outriggers are typically not as strong as the other 2 methods.
- Brackets like those above mount to the outside of the trailer frame. However, when they do not align with the cross members, they apply a twisting load to the main beam.
When using outriggers to extend the trailer frame around the wheels, check the perimeter loads. For a camper or tiny house, the weight at the perimeter can be high, so support the main frame beams with something under the frame tying the cross members to the outrigger load. If things do not support properly, the frame can be a little flexy.
Cross Members Over The Main Trailer Beams
 This is arguably the easiest way to extend a trailer frame around the wheels. Simply lay the cross members on top the main beams and make the length appropriate – longer around the wheels, and shorter at the wheels.
This is typical construction for deck-over trailers because the added height is needed so the deck is above the wheels. It can also work for non-deck-over trailers.
Caution: Do Not weld across the main beams. Instead, restrict welding to the top side edges of the main beams, so that welds are located along the underside of the cross-members. Welding across the main beams will weaken them – especially when welding an aluminum trailer frame. (This article talks about weakening the frame when welding spring brackets, which is the same for these cross members.)
Crossing Over Advantages:
- Simple construction. Very little extra effort is needed to assure the trailer floor is flat.
- No added parts required to get the side extension.
- Much less cutting and measuring required.
- Very little extra welding.
- No added torsion loads on the trailer frame main beams.
Crossing Over Disadvantages:
- This method requires extra height over the main beams. Often, this will raise the trailer deck.
- Make the cross members size for the perimeter load. Usually the load requirements for the cross member are more demanding in the center, so perimeter loads are not an issue, but do check this in your calculations.
- See the caution note above about welding. If the welding is not right, then the trailer frame is weaker.
With frame members crossing over one another, there are some nice advantages when it is right, and when the added height is not a problem. This technique is generally very robust and easy to build.
If you are willing to invest in more precise work, the Pass-Thru style (next) offers some strengths that can outweigh the extra complexity.
Cross Members Pass-Thru The Main Beams
 A third method to achieve a trailer frame around the wheels is cross members through the main beams. This method is not as often used, yet it provides many advantages for the right circumstances.
The concept is simple. Holes are cut through the main beams, then the cross members pass through those holes.
While this method is structurally very sound, it does require advanced manufacturing techniques, and is most applicable to single wall main beam applications like I-Beam and C-Channel. Also, it works best for tube cross members (not as well for angle iron or channel cross members).
Pass-Thru Advantages:
- Simple construction (if the holes are accurate).
- No added parts required to get the side extension.
- No cutting or fitting of outriggers to fit flanges of I-Beam or C-Channel.
- Once the holes are accurately cut, almost no measuring is required for frame assembly.
- Very little welding.
- Welding on the beams is not in the high stress areas, which gives maximum strength to the frame.
- No added torsion loads on the trailer frame main beams.
- No added height. Makes a great platform for a low deck height.
Pass-Thru Disadvantages:
- This method requires advanced manufacturing techniques – like laser cutting or water jet cutting so the holes are accurate.
- Closed section main beams require extra specialized equipment like laser tube cutters.
- Size the cross members appropriate for the perimeter loads. Usually the load requirements for a cross member are more demanding in the center, so perimeter loads are not an issue, but do check your calculations.
- Does not work so well if the main beams are small. (Basically, for short, and light trailers.)
We use this technique in our Tiny Home Trailers because it offers a super low deck height, and the opportunity for a better thermal envelope at the floor. Some trailer builders use this technique often because the advantages are so good for strength and frame integrity.
Obviously, the setup is very important, and there is more to the success than we have explained above.
Other Considerations
Or should we say:
Everything Else (Random)
Here is a list of various technical items, random thoughts, and some comparisons on the subject. More or less, things to consider when building or considering a trailer frame to extend out around the wheels.
Design:
- As noted above, the purpose and payload requirements must always dictate how the trailer frame is made. All of these have the potential to be strong with correct materials and positions.
- Wheel placement must be part of the design from the start. Not only the axle position, but also the distance between the axles (if tandem or more), and tire size. A trailer frame around the wheels does not allow much flexibility in axle placement.
Frame Construction:
- Suitable materials for the trailer frame are chosen no matter what style you choose. Calculations drive these choices.
- The same is true for welding techniques and for structural integrity. As noted above, some techniques require more welding, and some require less welding.
Wheel Well Integration / Fender Design:
- While they are not in most of the image above, wheel wells or arches to accommodate the wheels are appropriate, especially when the trailer frame is around the wheels. See the wheel wells in the photo of the enclosed trailer above.
- The design and fabrication of fenders or wheel enclosures will protect things and enhance the trailer’s appearance. They must seal to avoid water and grime intrusion from higher local pressures that exist in the wheel areas.
- The “how” for building wheel enclosures is beyond the scope of this article, but search to find many ways. Many off-the-shelf parts are available to assist.
- Ensure proper clearance between the wheels and the trailer body to prevent rubbing or interference.
Suspension System:
- Make sure there is appropriate suspension clearance so the wheels cannot rub the fenders or trailer frame. See the animation in this tandem equalizer article.
- Also with all trailers, be sure the axle and wheel alignments are right.
Load Capacity:
- Full width trailers (those with frames around the wheels) are usually heavier than their straight frame counterparts. (Simply because they have more material.) This means the available load capacity for things to carry is less.
- Load capacity calculates as usual: Max Capacity – Trailer Weight = Available Payload.
Weatherproofing:
- See the above note in the “Fenders” section.
- Apply weatherproofing measures to protect the trailer frame, as usual – especially for welding areas in the stream of the wheels because they kick-up debris as well as high velocity water.
Electrical Wiring:
- Trailer wiring can become a little more involved because wires for side markers must go over, under, or through the main beams. We don’t usually recommend going under, but the others are OK as long as the wires will not frey, or get pinched.
- Please see our full Trailer Wiring Diagram for wiring information.
Safety Features:
- There are no specific safety features for either style of trailer except the added need to see around a full width trailer.
- Reflectors, safety chains, lights, and breakaway systems for trailer safety are all the same.
Customization Options:
- There are too many customizing options to discuss here in how to build a trailer frame around the wheels. We have covered the basics, but even the images above are incomplete for a full trailer frame. Gussets and other things are still missing.
- In any customizing, use your creativity and ensure any custom features are compatible with your end goals. Don’t ever compromise safety or structural integrity.
Cost:
- Full width trailers (those with frames around the wheels) are almost always more expensive to build than the straight frame counterparts. They have more parts, more material, and more work to build. That makes them more expensive.
- The “Cross Members Over The Main Trailer Beams” style will cost least for the 3 versions discussed above.
- Second most costly is the “Outrigger” style because of the extra parts and extra labor.
- The “Cross Members Pass-Thru The Main Beams” might be more expensive depending on your access to the technology to cut the holes. However, it has less labor and fewer parts, so it can be cost effective if access to the cutting technology is easy.
- Estimating cost is always tricky, so finalize your designs, then get cost estimates.
Legal:
- There are no specific legal regulations for trailers of these styles (that I know). No need for Permits or special certifications – other than the obvious overall dimensions, weight limits, and safety standards. DOT does not treat one style or another differently, but the wider style trailer do have lower visibility, so give greater care when towing wider trailers.
Wrap-Up: Building A Trailer Frame Around The Wheels
When there are so many good ways to build a trailer, what should I choose? Only you can know that. Look at your goals, then look at the Advantages / Disadvantages listed above – along with the comparisons also given. Weigh it all in your mind, then you will know.
Good luck with your next trailer build.
We appreciate your kind contributions.
Thank You.


Comments