

This is Page 2, continuing the Bolts 101 article. Here we discuss choices for bolts for an application. The previous post, Page 1 of Bolts 101, gives a ton of good background info, so we recommend reading that first, then this one on making a good bolt choice. Both pages focus on the practical side rather than on all the theoretical detail.
The hard part is defining what bolts to choose for a given job. It’s the hard part because the rules of thumb have lots of exceptions. Also, it’s your judgement and responsibility for the bolt choice. If the joint is critical — especially if it’s for safety — perhaps some engineering help is appropriate. However, in most cases you can follow these guidelines and feel quite comfortable in making the decisions. Just note the exceptions.
This is Page 2, about How to choose the bolts to use.
Check out Page 3 for info specific to Stainless Steel bolts.
These pages have a practical focus. A Google search will give in-depth detail, so no need to repeat it here.
Bolt Choice Factor 1 – Size
When mounting an object that comes with bolt holes, use the size of bolts recommended by the manufacturer. If the item doesn’t have specific instructions telling you what bolts to use, then use a bolt size that fits nicely, and fills in the holes.
 The caster shown in the photo is a good example. It has 4 slots that accept 3/8″ or 10 mm bolts nicely. Either size works as a bolt choice. Note: Because the holes are slots, washers support the nut.
If the holes are not defined for the bolt size, there are lots of other considerations to select the size.
Factor 2 – Material Thickness
Use a bolt that works well with the thickness of the materials to connect. If you’re bolting thin sheet metal, then big diameter bolts will not make it more secure. In fact, when push comes to shove, the material will often fail near the bolts, so it’s better to have several smaller fasteners than one large one.
A typical rule of thumb . . . Use a bolt diameter that is 1.5 – 2.5 times (up to three times) the thickness of the thinner material you are bolting together. So, for 1/8″ material, a 1/4″ diameter is often a good bolt choice. For 1/4″ thick material, perhaps a 3/8″ or 1/2″ bolt.
This guideline falls apart for very thin materials, and for really thick stuff. In both these cases – if the joint is critical – it’s better to use more fasteners rather than bigger ones. Note: For thin materials, it’s usually best to back the joint with thicker material, like washers, or face plates, then the rules can apply again.
Choice Factor 3 – Function
What do the bolts need to do? Are they through bolts (bolt with a nut)? Or does the bolt go into a threaded hole? Maybe the threaded hole goes through? Or maybe it is blind (go into a threaded hole that does not go through)?
Most of the discussion in this article shows bolts with nuts (and washers), but there are a lot of applications where the threads exist in another part. Really, the discussion is almost the same either way. Trailer wheel bolts are a good example where some are bolts into a threaded hub, while other times they are studs with a nut. Read more in the Trailer Wheel Bolts article.
Anyway, function matters, and it is often connected with the other things on this page like Thread Engagement and Loading (both topics below). What do the bolts need to do? Hold stuff, yeah, but do think about what they are holding? How they are holding it? And, perhaps most important, how critical is it? The bolts you choose – grade, size, and number – should reflect what the bolts need to do.
Factor 4 – Number of Bolts
Have you ever noticed that bolts rarely appear with just one? How many bolts do you need?
When you bolt something, you are constraining it in one direction. Argumentatively, it constrains more with friction and extended face contact, but if you really want to hold the piece, it requires more bolts. 2 bolts constrain rotation, and at least 3 bolts (not in a line) for bending constraint. We often see sets of 4 because it’s an easy pattern, and it constrains many things very well.
Place bolt patterns so the bolts are spread — within reason. Generally, more distance between them makes the connection stronger. From the standpoint of holding things down, more is merrier, but it also makes things harder to work with.
The other reason for more bolts is safety. If the connection involves safety, better to over-kill.
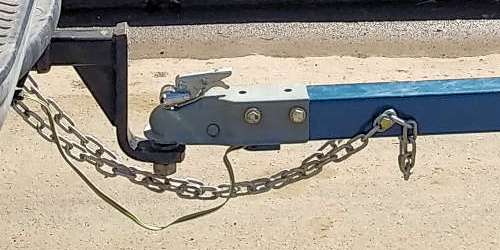
 The image here of the hitch illustrates some of these bolt choice factors. Bolt size is 1/2″ (defined by the hitch holes) — which is a little more than 2.5 times material thickness (less than 3 times), so that’s good in 3/16″ thick material. They are Grade 8 for strength because safety is definitely a concern. Fine thread with Nylock nuts for security in a vibration environment. The main connection forces are in shear, and they have sufficient distance for joint stability.
In the hitch example, there are 4 connections. Each bolt connects the materials twice, once on each side. The 4 connections are not linear, so it’s good for stability in bending.
Bolt Choice Factor 5 – Strength
Choose the bolt strength based on what you’re asking the bolt to do. For safety, think about higher strength bolts like Grade 8 or more. In shear forces, think about a diameter that will easily take the loads. With tension forces, thick about fine threads as well as higher grade material.
There are 2 ways to achieve higher strength. The first is the bolt material – the bolt grade. Second is the bolt diameter.
As a perspective, from the chart in Part 1, we see that (generalized) Grade 5 is about twice as strong as Grade 2. That’s a great way to increase strength. Another big improvement is diameter. When we consider diameter, a 3/8″ bolt is more than twice the strength of a 1/4″ bolt. In fact, it takes a high grade socket head 1/4″ bolt to match a 3/8″ grade 2 bolt. Truly, diameter is also a major factor. Consider this when using Stainless Steel bolts.
Proper bolt choice for strength comes with a balance of the other factors on this page. Sometimes we want a less strong bolt for impact or yield considerations.
By the way, when calculating bolt strength, use the root diameter of the threads (smallest diameter inside the threads), not the full diameter of the bolt. Also, think safety factors – and use them generously.
Choice Factor 6 – Thread Pitch
 Fine Thread or Coarse Thread? That’s a good question without a definitive answer. Here are some considerations.
- Coarse Threads don’t have as many threads, so they can install faster.
- Fine Threads can create more clamp force with the reduced thread angle.
- A Fine Thread bolt is slightly stronger than a Coarse Thread.
- For vibration, Fine Threads have an advantage (though Nylock nuts, LocTite, etc., are even better).
When choosing bolts, there is not a definitive criteria, so make a call based on the advantages.
For me, I tend to use Coarse threads for smaller bolts (1/4″, 6mm and smaller) most of the time. With larger bolts, I use fine threads in vibration situations and when clamping force is critical. On the folding trailer tongue, for instance, the clamping bolts are 1/2″-20 (fine thread). Grade 8 for strength over-kill. The pivot bolts are not tight (or it wouldn’t pivot), so they don’t enter the calculation, but they are the same size and thread so everything matches. (And, use the same wrenches on everything.)
Choice Factor 7 – Length
How long is enough? How long is too much?
Long enough is when the threaded portion sticks through the nut with a couple threads out. Too long is when the unused end of the bolt interferes with something — or, when the bolt can’t completely tighten. Just right might be the bolt you have in the bin (because you don’t have to go buy something).
With that said, don’t be afraid to cut a bolt. If it’s a little too long, cut it to be right, then finish the end. Likewise, if you need a long or custom bolt, make it with threaded rod. Read this full article on working with threaded rod.
Don’t forget the washers (if you need them) when thinking about length. Also, special nuts, like Nyloc nuts, require a little more length than standard ones.
For bolts threading into something (not a nut), the concept of “long enough” must also take into account the thread engagement which is our next bolt choice factor.
Choice Factor 8 – Thread Engagement
 It’s easy to think about bolts with nuts for fastening — especially for DIY. That makes things easy. However, once in a while, you need to tap a hole. Taps are pretty easy to use and, when done right, make great threads for screwing a bolt into. When making your own threads, here are some things to consider.
The rules of thumb for thread engagement involve the material the bolt is threading into as well as the bolt diameter. It is a ratio with thread engagement length as a function of the bolt diameter. For instance, 2x means the depth of thread engagement is twice the diameter of the bolt. In this case, for a 1/4″ bolt, thread engagement is 2x the diameter, or 1/2″. That’s just an example.
In general, use 1x for steel bolts into steel threads. 1.5x minimum and preferably 2x or more for aluminum. Magnesium and high strength plastics are 2.5x or 3x.
Again, these are rules of thumb, and alloys of the materials act differently. For Bolts 101 just use these numbers as a perspectives in your bolt choice.
You’ll note that most nuts are less than the 1x stated above. That has a lot to do with the way threads are formed. Cutting threads with a tap is not as strong as roll forming threads. Again, just a perspective.
Bolt Choice Factor 9 – Loading
Where do you put the bolts when you’re building something? While there are several ways that forces might interact with a bolt, some directions are definitely better than others. If you have a choice, think about bolt positions and force direction as well as convenience and access.
First choice is putting the bolts as Locators only. This works when the parts are pushing into each other and the bolts are only there to locate and hold the position. Not much bolt strength is required for this kind of joint. Although this is ideal, it’s often not how the forces direct.
Second choice is putting the bolts in Shear. That means the forces want to cut the bolts. Look above at the hitch photo. Forces of pulling the trailer and braking are perpendicular to the bolts. That is shear. Bolts are very strong in shear, and even when not fully tight, they are still strong in shear. That said, the bolt must be sized for the forces, so strength and diameter are both important.
The last choice is bolts in Tension. I say it’s last choice, but it’s often the only option — or in the case of the blue trailer tongue hinge, it’s the best option to meet other goals. Read the section about bolting in our review of the folding tongue for more explanation. In tension, the bolt relies on the the threads to carry the loads. When this is needed, use larger bolts, stronger bolts, and multiple bolts for best security.
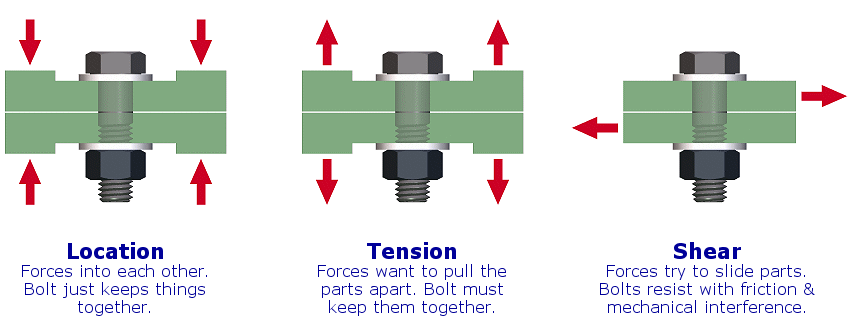
Mixed Forces
The truth is, most bolting connections are not just one of these forces, they are a combination. And, often the forces change at different times, so take that all into account.
 As an example, look at the caster photo. In a practical sense, the bolts are there primarily as locators. The wheels carry the loads to the flange, then the flange is against the steel support. In reality, there are also shear forces when the brake is on, or when twisting the caster. Then there are some tension forces when the wheel hits something (like a seam in a concrete floor).
Finally, sometimes forces reverse, like from Shear one way, to Shear the other. These oscillating or vibrating situations are the worst for bolt choice because they pose a challenge in keeping things tight. In these cases, we recommend using more bolts, fine threads, and perhaps especially, a method of vibration resistance. (Like locknuts or wires or cotter pin nuts, . . . .)
Bolt Choice Factor 10 – Environment
While it’s not really the last thing to consider, the environment for the bolt is pretty important. See Page 1 of Bolts 101 about finishes for more information. Also, please see Page 3 for information about Stainless Steel bolts if your environment will include significant moisture or chemicals.
Complications For Bolting
We often think of bolts in a classic way like so many of the images on this page. Bolt through a hole, and clamps tight. But there are other applications like the very top “feature” image. That bolt is sticking out using nuts to anchor it in place. The extending part uses the head and top portion of the bolt as a place to hook a spring.
 The spring hook bolt as pretty normal clamping — with nuts on either side of the structure. But what about more difficult situations like bolting a trailer safety chain? What about chain held by a bolt? Note the intersecting chain links that will not allow the bolted chain link to set fast against the metal surface. It’s hard to clamp the bolt solid because adjacent links are in the way. Bolt choice here is more about size and locking than about getting it properly tight.
In this case, washers are stacked to provide a foundation for clamping forces. (Washers with some grinding to fit the chain.) This can work, but when the bolts are not “tight”, they will move when yanked into service. Such situations are not necessarily bad, but certainly require added bolt strength (and size).
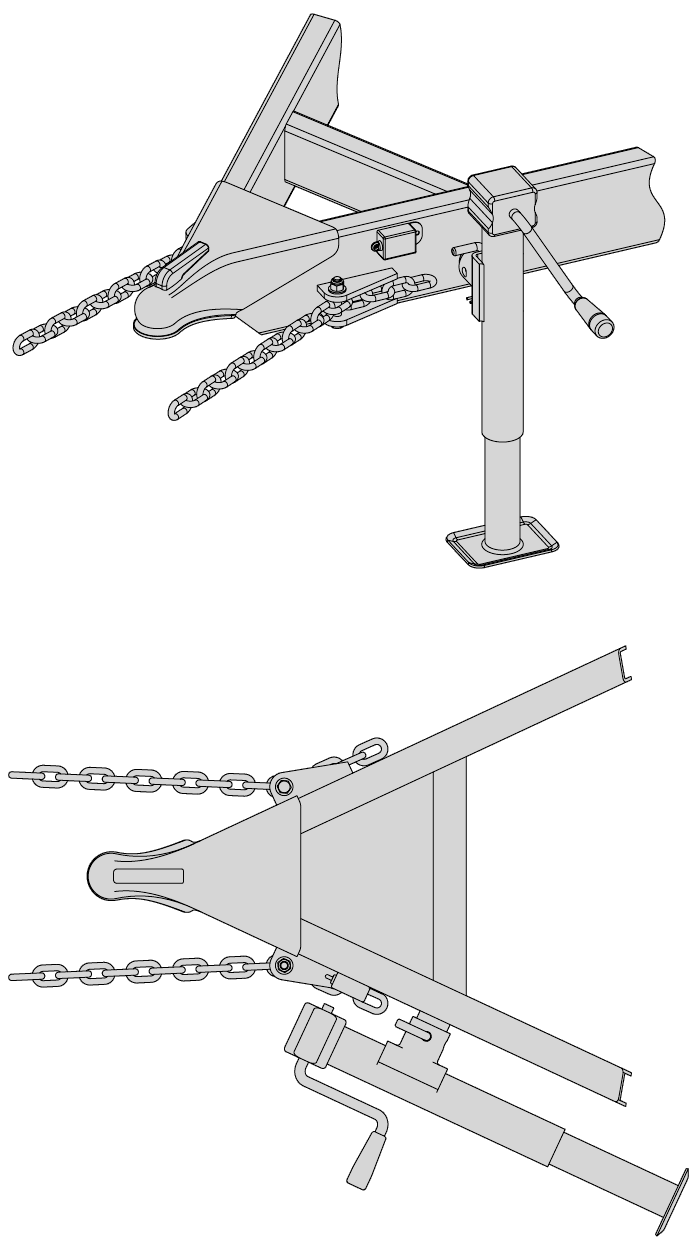
It’s not just a bolt choice, but also a bolting choice. Sometimes re-thinking function is the better way, so the bolts are solidly tight. Here’s an example. (See another example in the Chain Anchor System Free Plans Article.)
Bolt Hole Sizes
How much space do you allow for a bolt hole? A lot of DIY projects suffer from bolts that are either too loose in their holes, or too tight and hard to assemble. What’s the happy medium?
The problem, honestly, is not usually the size of any given hole, but rather, the alignment of holes with respect to each other. If you do things DIY with a scribe and a drill press, sometimes the holes don’t line up perfectly. Yeah, I’m right there, so here’s a post on Aligning Misaligned Holes.
Typically, I add something like 10% to 15% to the bolt diameter for the hole size. Example: 1/4″ bolt + 15% = 0.287″ so round to a 9/32″ drill = 0.281″ diameter. I tend to round down as the bolts get larger. Example: 1″ bolt + 15% = 1.15″. That would suggest a 1-1/8″ hole. To me, the 1/8″ hole is a little too loose (sloppy fit), so for bigger bolts, I make it more like 10%. Example: 1″ bolt + 10% = 1.1″ or with rounding = 1-3/32″ or even 1-1/16″.
A good rule of thumb is to add as much tolerance to the hole as you are able to hold in tolerance on the hole location.
Bolt Choice Wrap Up
As simple as bolts seem, there is actually a lot to know about them. This is a fairly simple overview as a Bolts 101 kind of DIY introduction. Yet, there is so much more to know. Fortunately, this is also a subject with a lot of great information on the web. Just search on the topics that you need to know. Things like “Bolt Thread Pitch” or “Bolt Shear Strength”. You’ll find a ton of great stuff in deeper detail.
Again, this article is an introduction with a practical spin rather than a scientific one. It’s about bolt choice, specifically because the practical side seems to be missing on the bolting sites we’ve seen. Let us know if we’ve skipped something important.
Here is some related reading. Nuts and Bolts 101 is a great overview of all sorts of bolting information. Then, when you need fasteners, see how to save money on bolts and where to shop. Good luck with your projects.


Comments